Beginner's Guide to Hand-Engraving Metal: Tools, Tips, and Tricks
Hand engraving metal is like stepping into an art form that is both challenging and rewarding. And a lot of jewelry creation involves this process. If you've ever admired an intricate metal design and thought, "I would love to make that," then you've come to the right place. In this guide we'll walk you through basic engraving tools as well as tips for beginners. Let's get started!
What Exactly Is Metal Engraving?
First of all, engraving metal is not like chipping wood - it is much harder. It is difficult to get started without specific tools, and you need some practice to master them. Metal engraving has a wide range of applications, such as patterns or inscriptions on couple rings. The purpose of metal engraving is to create a design, pattern or shape by removing material from the surface of the metal. It is also a form of artistic expression. Many beginners will be scared by the concept of "metal", don't worry, with the right tools and patience, even beginners can create amazing results.

The Tools You’ll Need to Get Started
Before you start engraving, you'll need a tool kit. Here's a breakdown of the essential tools for beginners:
1. Manual engraving tools
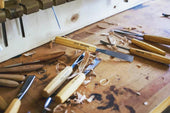
Hand engraving tools are the most basic tools for engraving metal, and they come in a variety of shapes and sizes, each designed for a specific task:
- V-shaped knives: Perfect for deep, defined cuts.
- U-shaped knives: Great for carving smooth curves.
- Flat-edge knives: Ideal for straight lines or smoothing surfaces.
If you are just starting out, you can buy a basic set that includes these three items for your daily practice. Once you have mastered the basics, you can choose more efficient electric engraving tools, such as the Engraving Pen and Pneumatic Engraver.
2. Steel Scriber
This handy tool can be thought of as a pencil for metal. You can use it to draw your design onto the surface of the metal part. It is very precise, and then you can follow these lines to engraving.
3. Files
Some metal burrs are inevitable during the engraving process, and files are essential tools for you to trim these burrs on the edges. For beginners, a set of needle files with different shapes (round, flat, triangular) is flexible and easy to operate.
4. Sandpaper
Polishing is an important step in metal engraving, and sandpaper plays a role in polishing. It can not only help you prepare some rusty metal materials, but also use it to polish the crafts after engraving. Sandpaper has different mesh counts. When polishing, start with a small mesh count and then gradually transition to a high mesh count. 600 to 2000 mesh sandpaper is a suitable range..
5. Workbench Clamp or Vice
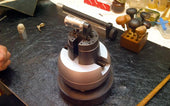
You definitely don't want the metal to slip while you're working. Small adjustable clamps can hold the workpiece firmly. For example, in jewelry engraving, some small objects are difficult to hold, so the Engravers Ball Vice is often used. It has a variety of attachments to hold different types and sizes of rings or other jewelry.
6.Small Hammer
When you need to add force behind your engraving tools, a lightweight hammer—preferably a rubber or metal one—comes in handy.
7. Rotary Tool (Optional)
If you want to speed up your work or add intricate details, a rotary tool is a game-changer. You can attach carving or sanding bits to make quick, precise cuts.
8. Polishing Tools
In the polishing process, not only sandpaper is used. In order to achieve more delicate polishing, we will use soft polishing cloth or even more advanced polishing machines.
9. Safety Gear
Metal shavings and dust are no joke. You'll need some protective gear to protect yourself during the engraving process. Here are some common ones:
- Safety goggles to keep shards out of your eyes.
- Cut-resistant gloves for your hands.
- A dust mask to avoid inhaling fine metal particles.
Choosing the Right Metal
Once you have all your tools ready to dive into metal engraving, another topic comes up. What metal to choose to engrave?
Know that not all metals are created equal, especially when it comes to engraving. Different metals have different properties, but the following three are perfect for beginners:
- Initial stage of practice: Aluminum, zinc, and tin are cheap and soft metals that are easy to carve and are suitable for initial practice.
- Gradually improving: copper, brass,a bit tougher than aluminum but still manageable, plus it has that lovely color.
- Advanced stage: gold, silver, stainless steel, gold and silver are relatively expensive materials and will put more pressure on beginners, while stainless steel is too hard for beginners to practice.

How to Start Hand-engraving Metal
Step 1: Prep Your Workspace
Set up a clean, well-lit area with your tools within easy reach. Clamp your metal securely to your workbench or table using your vice or clamp.
Step 2: Sketch Your Design
Use your steel scriber to lightly etch your design onto the metal. Don’t worry about perfection—it’s just a guide. If you’re nervous about freehanding, use a stencil or trace a printed design.
Step 3: Start Engraving
Pick your engraving knife based on the lines or shapes in your design.
Hold the knife at a steady angle and apply light, even pressure as you carve. It’s better to go slow and make multiple passes than to push too hard and slip.
For curves, switch to a U-shaped knife. For straight lines, the flat-edge knife works wonders.
Step 4: Refine the Edges
Once you’ve work out your design, use your files to smooth the edges and refine any rough spots.
Step 5: Sand and Polish
Sand the entire piece with progressively finer grits of sandpaper.
Use a polishing cloth and compound to give your metal a shiny, finished look.
Tips for Beginners
1. Practice on Scrap Metal
I recommend that you don't start making your "masterpiece" right away. You can practice on scraps first to get a feel for your tools and the resistance during engraving. This way you won't feel too much pressure on the real thing.
2. Keep Your Tools Sharp
Dull tools are harder to control and can mess up your design. Invest in a good sharpening stone to maintain your engraving knives.
- Take Breaks
Engraving metal is hard on your hands. Take breaks to rest and stretch to avoid fatigue.
4. Be Patient
This isn’t a quick process, and that’s okay! The best results come from taking your time.
Common Challenges (And How to Overcome Them)
The Metal Feels Too Hard: Try a softer metal or check your tools—they might need sharpening.
Uneven Cuts: Focus on steady, even pressure and make multiple light passes.
Design Errors: Mistakes happen! You can often smooth out or cover up small errors with files or sandpaper.
Conclusion
Hand engraving metal may seem daunting at first, but with the right tools, a little patience, and lots of practice, you'll be surprised at what you can create. Engraving is never easy, and it takes a lot of practice. Don't forget to have fun while you're at it—after all, the journey is as rewarding as the result. Now, pick up your tools and start engraving!
View more related articles
Four Practical Ways to Engrave Metal
How to Buy High Quality Metal Engraving Tools?
Tips for Using Engraving Tools
Sharpening tools: A Good Helper for Jewellery Engraving
Advantages and disadvantages of machine carving and hand carving


