

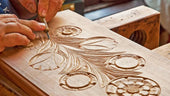
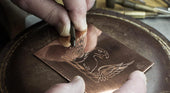
How to practice carving flowers technique in wood carving
Whether it is the complicated and delicate flower cluster style on top of vintage wood furniture or the small flower and grass pattern carved on top of minimalist wood furniture, the charm of the carving technique shown on top of the wooden furniture will be extraordinarily eye-catching. So how can a beginner woodcarver master this technique of carving flowers? Please follow the content of this blog, a little slowly start learning it.
Preparation before carving
Selection of materials for carving
Wood carving is one of the most important learning is to select the carving wood, select a suitable piece of wood for beginners is very necessary first step. Beginners are recommended to choose a softer texture, uniform texture of wood, such as basswood, pine. Pine is most recommended for carving flowers. It is easy to carve and not easy to crack, and the hardness is soft, suitable for beginners to begin to learn the technique of carving simple flower patterns.
Preparing Your Carving Tools
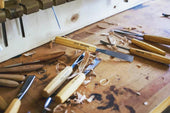
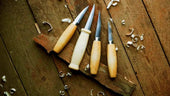
Carving flowers do not need to use professional equipment such as carving machine or mill, beginners can prepare a set of basic learning engraving tools.
- Carving knives: Prepare flat, round and V-shaped knives for shaping different parts of the wood carving flowers.
- Chisel and mallet: a wood blow helps to apply an even force for removing large pieces of wood and carving the basic shapes of the entire flower wood carving.
- Sandpaper: Used for sanding and finishing details that are not flat on the carving surface.
- Pencil and transfer paper: used to draw and transfer the design.
Wear good protective equipment
Practicing carving flowers produces a lot of fine wood chips, so remember to wear goggles and a dust mask before you start. In addition, the knives are sharp, so it is advisable to wear protective gloves to avoid cutting your fingers with the knives.
Design and engraving process
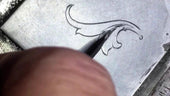
Design Sketch
Before you start carving, prepare a piece of sketch paper and draw a sketch of the flower you want to carve. Beginners can start with a simple five-petaled flower or rose and progress to more complex designs. Transfer the sketch to the surface of the wood using transfer paper to ensure that the design is clearly visible.
Simple carving techniques
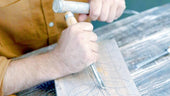
Start by removing large pieces of excess wood with a chisel and mallet to outline the basic outline of the flower. Then carve in layers, working from the outside in, working on the shape of the outer edges of the outermost petals before progressively going into more detail. For example, if you are carving a five-petaled flower, you will first carve the five petals, then deepen the details for each petal, and finally carve the inner structure of the flower.

Carving process
The details that need to be carved after the prototype is completed are as follows:
- Petal texture: Use a V-shaped knife to carve the veins of the petals to add a sense of three-dimensionality.
- Stamen details: Use a round cutter to carefully carve the stamen part, pay attention to maintain symmetry.
Control the strength of the carving
Beginners in the carving strength to be uniform, to avoid excessive force resulting in wood cracking. For the details, you can use “gently push slow cutting” way to ensure that each knife is accurate in place.
Carving follow-up work
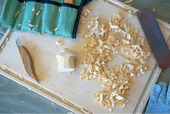
Cleaning up debris after completion: After carving, use a soft brush to clean up wood chips and dust to ensure a clean surface.
- Sanding and polishing: Use sandpaper of different grits (from 120 grit to 600 grit) to gradually sand until the surface is smooth. For details, the surface can be finished with the help of a sandpaper stick.
- Waxing: To protect the wood and enhance the shine, apply a layer of wood wax oil or beeswax to the surface.
- Attention to storage: The finished work should be stored in a dry and ventilated place, avoiding direct sunlight and humid environment to prevent the wood from warping or cracking.
Advanced carving flower techniques
Once you have mastered the basic flower carving techniques, you can try the following advanced methods:
- Multi-layer carving: Carve multiple layers of petals on a single piece of wood to add dimension.
- Combination carving: Combine different types of flowers to create more complex patterns.
- Inlay work: Add other materials (such as shells or metal) to the carved flowers to enhance the artistic value.
Conclusion
As carving is a skill that takes a lot of time to practice slowly, learning the techniques involved in carving flowers also requires the carver to be patient and serious about learning at all times. Although beginners may find it challenging, with systematic practice and patience, you will surely be able to master the art. Whether you are carving flowers to decorate your furniture or purely for the pleasure of carving, carving flowers can bring you endless satisfaction. Now, grab your tools and start your journey in wood carving!
View more related articles
10 Essential Woodcarving Techniques for Beginners
The easiest way to color wood carving
Carving process of wood carving
A Must for Newbies: An Easy-to-Follow Guide to Letter Carving in Wood


You May Also Like
-
The New Favorite of Handmade Wood Carving Industry - Pneumatic Engraving Machine
With the advancement of modern science and technology, tr...
-

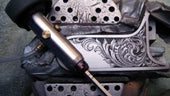
Metal Engraving Techniques That Beautify Jewelry
Just as one is always willing to be drawn to something mo...
-
How to Make a Gemstone Ring?
Discover how gemstone rings are made and experience the u...
-

What Tools Do You Need to Be a Silversmith?
This is a beginner's guide to silversmithing. Many people...
-

How Do Beginners Make a Simple Silver Ring?
Making a silver ring for your lover is a very romantic th...
-
What Kind of Microscope Do Jewelers Use?
Microscopes are called the third eye of jewelers. Accordi...
-
From Hobbyist to Pro Artisan: Your Tool Upgrade Roadmap
You've carved 50 wooden spoons, sold your first custom si...
-
How To Choose a Engraving Vise?
Engraving vises are a type of clamping tool that engraver...
-
10 Essential Woodcarving Techniques for Beginners
Woodcarving is an interesting and creative art. It is not...
-
10 Tips To Teach You How To Solder Jewelry
Are you worried about the soldering technique for making ...
-
A Complete Guide to Prong Settings
Setting is a common technique in jewelry making, and claw...
-

A Complete Guide To DIY Jewelry Making
DIY jewelry making is a very interesting but not easy thi...
-

Beginner's Guide to Hand-Engraving Metal: Tools, Tips, and Tricks
Hand engraving metal is like stepping into an art form th...
-
What Are The Advantages Of Pneumatic Engraving Compared To Push Engraving?
In the engraving process, pneumatic engraving is an indis...
-
Four Practical Ways to Engrave Metal
Metal carving is the carving of a design or pattern into ...
-

Do You Know How to Engrave Tungsten Rings?
In recent years, tungsten material will be stronger and m...
-
How Do You Re-Engrave Old Jewelry?
Jewelry has a permanent beauty and unique value, and many...
-

Pneumatic Engraving Machine Vs Electric Engraving Machines
As the industrial revolution took place, machines changed...
-
The Joy of Carving Wood
Wood carving is not only a handcrafted art with a long hi...
-
How to Buy High Quality Metal Engraving Tools?
It is said that metal engraving is an extremely testing c...
-

A New Engraving Experience for You with the AT Series Motors!
We have exciting news to share with you! The AT Series mo...
-

How to Choose a Mill for Jewelry Making?
In the process of jewelry making, a jewelry mill is a ver...
-
How to Choose and Use Jump Rings?
If you are a jeweler then you are no stranger to the term...
-
Teach You How to Pick a Jewelry Engraving Machine
Jewelry engraving machine is an indispensable tool for th...
-
How Do You Cast Jewelry?
Jewelry casting is a common way of casting jewelry. In fa...
-
A Comprehensive Guide to Jewelry Engraving
Jewelry will be preferred by many people as a gift, but h...
-

Tips for Using Engraving Tools
If you are a beginner who is just getting into carving, a...
-

Katway to Participate in Hong Kong Jewelry Show 2024
In recent years, Katway's brand strength has been improvi...
-
The Creative Path of a Jewelry Beginner
Embarking on a jewelry making journey is not only a form ...
-

The Secrets of Handmade Jewelry Engraving
Hand engraved jewelry is still used by many jewelers as a...
-
Tips for Making Silver Jewelry
Silver as a metal is a very common metal, and nowadays th...
-

How Do Beginners Use Jump Rings?
A jump ring is an essential piece of jewelry making, you ...
-
Method of Making a Carving Knife and Template Set(Ⅱ)
The last blog on making engraving tools talked about the ...
-
Six Common Casting Process Introduction
Casting Process The casting process is generally used to ...
-

Method of Making a Carving Knife and Template Set(Ⅰ)
If you are interested in carving, then you must carving k...
-
A Must for Newbies: An Easy-to-Follow Guide to Letter Carving in Wood
Do you want to know how to carve letters in wood? If you ...
-
Unlocking the Secrets of Metal Laser Engraving
With laser equipment, marking operations, whether it is a...
-
Do You Know What Metal Engraving Is?
To talk about metal engraving, we need to first understan...
-
About the Identification of Real and Fake Pearls
Pearls are an ancient organic gemstone that existed about...
-

About Jewelry Appraisal, You Need to Use the Tool - Gemstone Microscope
In recent years, with the number of gemstone enthusiasts...
-
Uses of Different Types of Microscopes
Many people know that microscopes can be used to look at ...
-

Katway's 2024 Jewelry Fair Tour - INHORGENTA MUNICH
In 2023, our company Katway took part in the Hong Kong Je...
-
How to choose the best jewelry engraving machine?
Do you want to make your own engraved jewelry that suits ...
-
Guide to Jewelry Engraving
Jewelry engraving is a work of art that involves pattern ...
-
Sharpening tools: A Good Helper for Jewellery Engraving
In the working process of a jewellery engraver, the perfo...
-

Katway's Journey to Jewelry Show 2023
In September 2023, Katway was invited to participate in J...
-
Vacuum casting in the jewelry process
With the continuous development of science and technology...
-
Engraving Machine Buyer's Guide on HH-R01 and HH-AT03
Common points of HH-R01 and HH-AT03 Do not need an air c...
-

Everything You Need to Know About Jewelry Engraving
Carving is an ancient skill that has been around since th...


